15-Minute Loaded Chicken Quesadillas, Desi Style
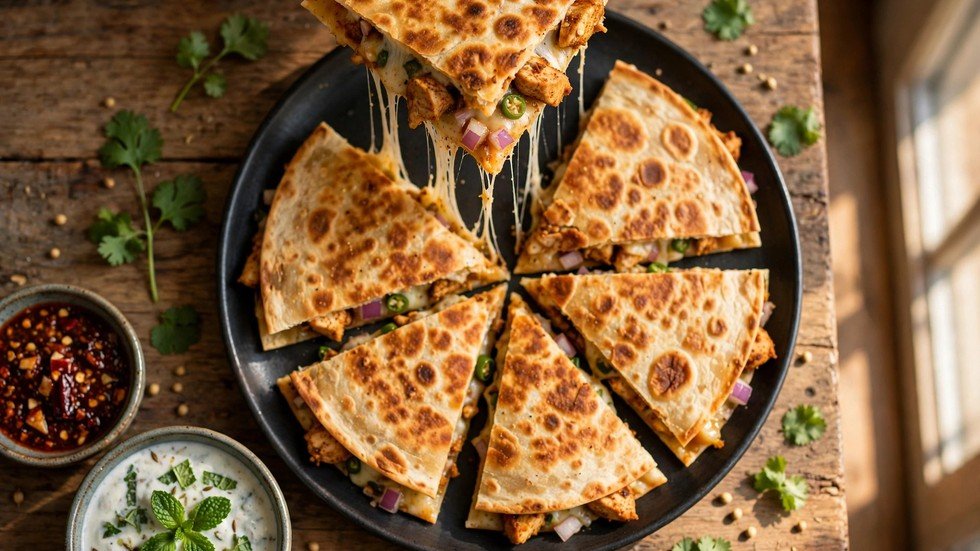
Some of my best recipes were born from leftovers and impatience, and these desi chicken quesadillas are no exception. This one came from a Friday night with half a bowl of tikka-flavored chicken in the fridge, a pack of tortillas nearing their date, and a block of cheddar I was definitely not going to let go to waste. Fifteen minutes later I was eating something that tasted like the best street-food mashup I’d never ordered: the crispy, buttery crunch of a quesadilla with the warm, familiar spice of home.
Here’s the thing about quesadillas — they’re a technique more than a recipe. Tortilla, filling, cheese, heat. Once you understand the few rules (medium heat, don’t overfill, shred your own cheese), the format accepts almost anything. The desi filling is what makes these sing: chicken tossed in tikka spices with yogurt, so it stays juicy inside that crispy shell, plus sharp red onion and green chili cutting through the richness of the cheese.
My family now requests these more than actual tacos. My mother, who raised an eyebrow at “Mexican roti,” ate three wedges and asked when I was making them again. That’s the review that matters.
Quick Stats for Desi Chicken Quesadillas
- Prep Time: 5 minutes
- Cook Time: 10 minutes
- Total Time: 15 minutes
- Servings: 2 (makes 4 quesadillas)
- Difficulty: Easy
- Best Served With: Mint raita and chili-garlic chutney
Equipment Needed
Nothing fancy — if you can make a paratha, you can make a quesadilla.
- A large skillet or tawa — wide enough to fit a full tortilla flat. Non-stick or well-seasoned cast iron both work. Avoid ridged grill pans; you want full, even contact for maximum crispiness.
- A wide spatula — for the flip. A fish spatula is actually perfect here: thin, wide, and flexible.
- A box grater — for the cheese. I’ll explain why pre-shredded cheese is the enemy below.
- Knife and cutting board — for the onion, chilies, and coriander.
Ingredients & Substitutions
For the desi chicken filling:
- 250g boneless chicken, cut into small bite-size pieces — breast or thigh, cut small so it cooks in minutes. Or skip the cooking entirely and use 2 cups of leftover roast chicken, tikka, or even shredded rotisserie chicken.
- 2 tablespoons plain yogurt — the marinade base. It tenderizes the chicken and keeps it juicy in the hot pan. Use full-fat; low-fat yogurt splits and goes grainy.
- 1 tablespoon tikka masala or tandoori masala — store-bought is completely fine. No tikka masala? Mix 1 teaspoon each of cumin, coriander powder, paprika, and garam masala with half a teaspoon of salt.
- ½ teaspoon ginger-garlic paste
- 1 tablespoon oil — for cooking the chicken.
For assembly:
- 4 large flour tortillas — the soft taco size, about 10 inches. In a real pinch, thin homemade rotis work surprisingly well, though they crisp differently.
- 2 cups cheese, grated — a mix of mozzarella (for the stretch) and sharp cheddar (for flavor). Grate it yourself — I’ll die on this hill in the tips section.
- 1 small red onion, finely diced — sharpness to cut the richness.
- 1 green chili, finely chopped — optional but recommended.
- 2 tablespoons fresh coriander, chopped
- 2 tablespoons butter, softened — for the outside of the tortillas. This is what gives you that golden, shattery crust.
Step-by-Step Method
Step 1: Marinate the chicken (2 minutes, mostly hands-off). Toss the chicken pieces with yogurt, tikka masala, ginger-garlic paste, and a pinch of salt. Even two minutes of contact makes a difference — the yogurt’s acidity starts tenderizing immediately, and the spices hydrate into a paste that clings instead of burning. If you have ten spare minutes earlier in the day, marinate longer. If not, two minutes is honestly fine at this scale.
Step 2: Cook the chicken hard and fast. Heat the oil in your skillet over high heat. Add the chicken in a single layer and don’t touch it for 2 minutes — you want charred, caramelized edges, the kind of flavor that makes people ask what your secret is. (It’s the char. It’s always the char.) Toss and cook 2 more minutes until cooked through. The pieces are small, so this is quick. Transfer to a bowl. Don’t wipe the pan — those browned bits are going straight into the quesadilla’s flavor.
Step 3: Mix the filling. To the warm chicken, add the diced red onion, green chili, and coriander. Toss together. Mixing while the chicken is warm lets the onion soften just slightly and the coriander release its aroma. Taste and adjust salt — the cheese adds saltiness too, so season with a light hand here.
Step 4: Assemble — and don’t overfill. Lay out the tortillas. Spread a thin layer of grated cheese over one half of each tortilla — cheese first, because it acts as glue. Spoon over a quarter of the chicken mixture per tortilla, then another thin layer of cheese on top. Fold in half. Here’s the rule that ruins most homemade quesadillas: restraint. An overstuffed quesadilla won’t seal, won’t flip, and leaks cheese all over your pan. Thin, even layers. You should be able to press the edges nearly closed.
Step 5: Butter the outside and cook on medium heat. Wipe out the skillet, return it to medium heat — not high. Spread a thin layer of softened butter on the outside of each folded quesadilla. Lay them in the pan (cook in batches if needed) and press gently with the spatula. Cook 2–3 minutes per side until deep golden and crisp. Medium heat is deliberate: high heat burns the tortilla before the cheese melts, low heat makes it steam soft instead of crisp. You’re looking for the moment the cheese starts oozing at the edges.
Step 6: Rest, then cut. This step gets skipped and it shouldn’t be. Let each quesadilla rest for exactly one minute on a cutting board. The cheese sets just enough that it doesn’t all run out when you cut, but it’s still gloriously melty. Cut into 3 wedges per quesadilla with a sharp knife or pizza cutter. Serve immediately with mint raita.
Pro Kitchen Tips for Desi Chicken Quesadillas
- Grate your own cheese — this is the big one. Pre-shredded cheese is coated in starches and cellulose to stop it clumping in the bag. Those same coatings stop it melting smoothly. A block of mozzarella and two minutes with a box grater gives you a cheese pull that bagged cheese physically cannot produce.
- The cheese-glue method. Cheese on the bottom, filling, cheese on top. The bottom layer melts into the tortilla and anchors everything; the top layer seals the fold. This is how restaurant quesadillas survive the flip.
- Medium heat is the whole technique. I know high heat feels faster. But a quesadilla is a race between two things: the tortilla crisping and the cheese melting. Medium heat lets both finish at the same time. High heat gives you a burnt shell around cold cheese.
- Press, don’t smash. Gentle, even pressure with the spatula maximizes contact with the pan for even browning. Smashing squeezes the filling out the sides.
- Leftover chicken is the fastest version. Already-cooked tikka, roast chicken, even last night’s karahi shredded up — toss it straight into the filling and skip Step 2 entirely. Dinner drops to 8 minutes.
Troubleshooting Advice
- My quesadilla is soggy, not crispy. Two causes: the heat was too low (the tortilla steamed instead of frying), or the filling was wet. Fix the first with true medium heat and patience. Fix the second by draining any liquid from the chicken before assembling — wet filling is the number one sogginess culprit.
- The cheese isn’t melting but the outside is done. Your heat was too high, or the cheese layer was too thick and cold. Lower the heat, cover the pan with a lid for the last minute — trapped steam melts cheese fast — and next time use thinner cheese layers at room temperature.
- The filling falls out when I flip. Overfilled, almost certainly. Use less filling than feels right. Also, make sure the cheese-glue layers are in place, and slide the spatula fully under the quesadilla before committing to the flip — a half-supported flip is a doomed flip.
- The tortilla burned before the inside warmed through. Heat too high. There’s no rescue for a burnt tortilla; start that one over on medium. If your stove runs hot, medium-low is your medium.
- It tastes good but flat. It needs acid or freshness. A squeeze of lemon over the filling, more raw onion, or a side of mint raita for dipping fixes this instantly. Rich + spicy food always wants something bright alongside.
Desi Chicken Quesadillas FAQs
Can I use leftover chicken instead of cooking fresh?
Please do — it’s the best version. Shredded tikka, roast chicken, or even leftover curry chicken (drained of excess gravy) all work. Warm it through in the pan for a minute with a pinch of extra tikka masala to wake up the spices, then assemble as normal. This shortcut takes the recipe down to about 8 minutes.
Can I make these ahead for meal prep?
Assemble them fully (uncooked), stack with parchment paper between each, and refrigerate for up to 2 days. Cook straight from the fridge, adding an extra minute per side. I don’t recommend cooking them ahead — a reheated quesadilla never recovers its crispness. The microwave is especially tragic; use a dry skillet or air fryer to revive.
Can I make a vegetarian version?
Absolutely. Swap the chicken for spiced paneer (crumbled, tossed in the same tikka-yogurt marinade and pan-fried), or a mix of black beans and corn with the same spices. Mushrooms work too — slice them thin and sear hard so they go meaty and brown rather than soggy. Keep the cheese and technique identical.
Fusion food gets a bad reputation when it’s random, but these desi chicken quesadillas aren’t random — it’s two food cultures agreeing on fundamentals: crispy bread, juicy spiced meat, molten cheese. Make it once and it’ll join your weeknight rotation permanently. In my house, it already has.
You Might Also Like
If you love handheld desi dinners, try our 15-Minute Masala Omelette Chapati Wrap next — another quick wrap the whole family will enjoy.