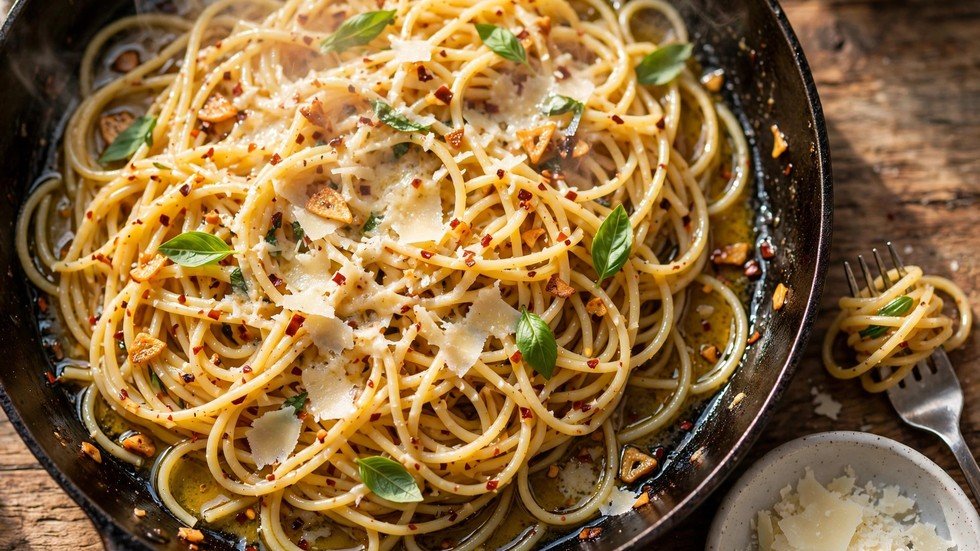
15-Minute Garlic Butter Pasta (One Pan)
It was one of those evenings where the day had taken everything out of me and I still had to feed a hungry family. My kids were asking for pasta, my husband was ten minutes from the door, and the thought of boiling water in one pot, making sauce in another, and washing both felt like too much. That was the night I finally tried cooking the pasta right in the sauce, in a single pan.
Here’s the magic I discovered: when pasta cooks in the pan with its sauce, it releases starch directly into the liquid. That starch thickens the butter and broth into a silky, glossy coating that clings to every strand — no separate pot, no draining, no watery sauce sliding off the noodles. The garlic toasts in the butter, the chili flakes bloom, and by the time the spaghetti is al dente, the sauce is already done. One pan. Fifteen minutes. And my picky six-year-old asked for seconds, which in my house is the only review that matters.
I’ve made this forty times since, and it’s never let me down — the dish I cook when friends drop by unannounced or the fridge is nearly empty. The butter makes it rich, the garlic makes it sing, and a final toss with parmesan and starchy pasta water turns a humble pan of spaghetti into something restaurant-worthy. Let me show you exactly how I do it, and why every step matters.
Quick Stats for 15 Minute Garlic Butter Pasta
- Prep Time: 5 minutes
- Cook Time: 10 minutes
- Total Time: 15 minutes
- Servings: 3–4
- Difficulty: Easy
- Best Served With: Garlic bread or a crisp green salad with lemon dressing
Equipment Needed
You don’t need anything fancy for this — the whole point is speed and simplicity.
- A large, deep skillet or sauté pan (30 cm / 12 inch): This is non-negotiable. The pasta needs to lie flat-ish in the pan and the liquid needs room to bubble around it. A shallow frying pan won’t hold enough liquid; a stockpot works but a wide pan gives better evaporation, which concentrates the sauce.
- Tongs: You’ll use these to turn and swirl the pasta as it cooks. Tongs let you lift and redistribute the strands so nothing sticks, and they’re perfect for the final toss that builds the glossy sauce.
- A lid (optional but helpful): Covering the pan for the first couple of minutes traps steam and helps the pasta soften evenly without needing extra liquid. Any lid that roughly fits will do — even a large plate in a pinch.
- A microplane or fine grater: For the parmesan. Pre-grated cheese from a shaker tin won’t melt into the sauce the same way because of the anti-caking starch coating — fresh-grated parmesan dissolves into silk.
Ingredients & Substitutions
- 250 g (about half a standard packet) spaghetti or linguine: Long strands work best here because they coil beautifully and grab the sauce. Broken in half if your pan is small. Short shapes like penne work too — add a minute or two of cook time. Whole wheat spaghetti is fine but absorbs more liquid, so keep an extra splash of water handy.
- 4 tablespoons butter (about 60 g): The soul of the dish. Salted or unsalted both work; if using salted, ease back on added salt. Desi-friendly tweak: swap half the butter for desi ghee — the nutty, caramel depth of ghee with garlic is extraordinary, and my mother-in-law swears it’s better than the original.
- 6–8 garlic cloves, thinly sliced: Slice, don’t mince. Thin slices toast to golden chips that stay tender; minced garlic burns in seconds and turns bitter. If you only have garlic paste, use 1 tablespoon but add it later, after the butter stops foaming.
- 1 teaspoon red chili flakes (adjust to taste): This is where you control the personality. A pinch for the kids, a full teaspoon for the adults. Desi-friendly tweak: replace with 1–2 finely chopped green chilies for a fresher, sharper heat that feels right at home next to garlic.
- 3 cups (720 ml) hot water or light chicken/vegetable stock: Hot liquid keeps the cooking fast — cold water drops the pan temperature and adds minutes. Stock adds background savoriness; water keeps the garlic-butter flavor pure and bright.
- 1 teaspoon salt (plus more to taste): You’re seasoning the pasta AND the sauce in one go, so don’t be shy. Remember the parmesan adds saltiness at the end, so taste before adjusting.
- ½ teaspoon black pepper, freshly cracked: Fresh cracks give little pops of heat that pre-ground pepper can’t match.
- ½ cup (40 g) freshly grated parmesan, plus extra to serve: The cheese melts into the starchy sauce and turns it creamy without a drop of cream. Grate it fresh — this matters more than almost anything else in the recipe.
- A handful of fresh basil or parsley, roughly torn: Basil is classic; parsley is fresher and cheaper. Coriander works in a pinch and my kids genuinely can’t tell the difference.
- 1 tablespoon lemon juice (optional but recommended): A squeeze at the end lifts the whole dish — the acidity cuts through the butter and makes the garlic taste brighter.
Step-by-Step Method
Step 1: Bloom the garlic and chili in butter (2 minutes). Melt the butter in your large skillet over medium heat until it foams and the foam just starts to subside. Add the sliced garlic and chili flakes and stir constantly for 60–90 seconds until the garlic turns pale gold at the edges. WHY: This step is called blooming — fat carries flavor, and toasting the garlic and chili in butter draws their aromatic compounds into the fat, which then coats every strand of pasta. Pull it off the heat the moment the garlic is golden; it goes from golden to bitter-brown in about twenty seconds, and there’s no recovering burnt garlic.
Step 2: Add water and pasta (1 minute). Pour in the hot water or stock, add the salt and black pepper, and lay the spaghetti in the pan. It won’t be fully submerged at first — that’s fine. Nudge it around with tongs as it softens, which takes about a minute. WHY: Starting with hot liquid keeps the clock honest. The pasta begins releasing starch immediately, and that starch is the entire reason this one-pan method works — it will thicken the cooking liquid into a sauce rather than leaving you with plain boiled water to drain away.
Step 3: Simmer, covered, stirring often (7–8 minutes). Bring to a lively simmer, cover with the lid, and cook for 7–8 minutes, uncovering every couple of minutes to stir and turn the pasta with tongs so no strands glue together. WHY: The lid traps steam so the exposed pasta softens without extra water, and frequent stirring does two jobs — it prevents sticking, and it agitates the starch out of the noodles into the liquid. That starchy liquid is your sauce in the making; every stir makes it silkier. Taste a strand at 7 minutes — you want it just shy of al dente because it keeps cooking in step 4.
Step 4: Build the glossy sauce (2 minutes). Uncover, crank the heat to medium-high, and toss vigorously with tongs for 1–2 minutes as the liquid reduces. When the pan looks saucy rather than soupy — the liquid should coat the back of a spoon — take it off the heat, scatter over the parmesan, and toss again until it melts into a glossy, clinging sauce. Splash in 2–3 tablespoons of extra hot water if it looks tight. WHY: The parmesan goes in off the heat so the cheese melts into silk instead of seizing into grainy clumps (high heat + cheese = rubber). The final vigorous toss emulsifies butter, starch, and cheese into one unified sauce — this is the restaurant trick, and it takes ninety seconds.
Step 5: Finish and serve immediately. Shower with the torn basil or parsley, squeeze over the lemon juice, crack over more black pepper, and serve straight from the pan with extra parmesan on the side. WHY: Pasta waits for no one — the sauce tightens as it cools because the starch keeps absorbing liquid. That lemon squeeze at the very end wakes up the richness the way nothing else can. Serve it now, while it’s glossy and steaming.
Pro Kitchen Tips
- Grate your own parmesan — always. I cannot stress this enough. The pre-grated kind contains cellulose and starch to stop clumping, and those coatings stop it melting smoothly. A small wedge of real parmesan and a cheap microplane take thirty seconds and change the entire dish. This is the single biggest upgrade you can make.
- Keep a kettle of hot water nearby. Different pasta brands absorb different amounts of liquid, and there’s nothing worse than a pan going dry with crunchy pasta. A splash of hot water fixes tight sauce, dry spots, and over-reduced pans without breaking your stride or cooling the pan down.
- Undercook by one minute, always. The pasta keeps absorbing sauce off the heat, so pull it when it still has a definite bite. Mushy one-pan pasta is the most common failure I see, and it’s always because someone cooked to full tenderness in the pan and then it softened further while resting.
- Double the garlic, not the butter. If you want more garlic punch, add more garlic — not more butter. Extra butter just makes it greasy; extra toasted garlic makes it intense. I routinely use 10 cloves for garlic-loving guests and it never overwhelms because toasting mellows the raw bite.
- The desi ghee version is worth trying. Replace 2 tablespoons of butter with desi ghee and add the green chilies instead of chili flakes. The ghee’s nutty depth makes this taste almost like a fusion dish — my family now requests “the ghee one” specifically. Finish with coriander instead of basil and it sits perfectly next to a desi dinner spread.
Troubleshooting Advice
- Problem: The sauce is watery and sliding off the pasta. → Cause: Too much liquid, or you drained the starch by not stirring enough. Fix: Crank the heat and toss for 2–3 extra minutes to reduce. Next time, start with 2½ cups of liquid instead of 3 and stir more often — starch needs agitation to thicken.
- Problem: The garlic tastes bitter. → Cause: It browned too far — minced garlic or too-high heat. Fix: There’s no saving burnt garlic; bitter notes will haunt the whole pan. Start that step over with fresh sliced garlic on medium heat. Watch for pale gold, not brown, and never walk away during the bloom.
- Problem: The parmesan turned grainy and clumpy. → Cause: Added over high heat or tossed too little. Fix: Take the pan fully off the heat before adding cheese, toss vigorously and continuously, and add a splash of hot water to loosen. Freshly grated cheese melts; shaker cheese clumps — check which you’re using.
- Problem: Pasta stuck together in clumps. → Cause: Not stirred during the first few minutes when the surface starch is stickiest. Fix: In the moment, work the clumps apart gently with tongs and add a splash of hot water. Prevent it by stirring well every 2 minutes, especially at the start.
- Problem: Bland despite following the recipe. → Cause: Under-salting the cooking liquid. Fix: This is the most common issue with one-pan pasta — since there’s no big pot of salted water, all seasoning comes from what you add to the pan. Taste the liquid at minute 5; it should taste like a well-seasoned soup. Adjust salt, then finish with lemon and extra parmesan.
15 Minute Garlic Butter Pasta FAQs
Can I use a different pasta shape?
Absolutely. Short shapes like penne, fusilli, or farfalle work beautifully — their nooks trap the buttery sauce even better than spaghetti. Add 1–2 minutes to the simmer time and an extra ½ cup of liquid, since chunkier shapes absorb more. Avoid very thin shapes like angel hair, which overcook before the sauce reduces, and avoid stuffed pasta like tortellini, which needs gentler handling.
Is this recipe kid-friendly?
It’s one of the most kid-approved dinners in my rotation. Make the base batch with just a tiny pinch of chili flakes (or none), then add extra chili to the adult portions at the table. The buttery, cheesy flavor is basically a cousin of mac and cheese, which is why children inhale it. My six-year-old calls it “the yellow noodles” and requests it weekly.
Can I add protein or vegetables to make it a full meal?
Yes — and it barely adds time. Toss in a handful of baby spinach or frozen peas in the last 2 minutes of simmering; they’ll wilt right into the sauce. For protein, add cooked shredded chicken, sautéed mushrooms, or a tin of drained tuna when you add the parmesan. Sliced chicken sausage, browned in the butter before the garlic, is my husband’s favorite variation and still keeps the whole thing under 20 minutes.
One pan, fifteen minutes, and a dinner that tastes like you planned it all day. That’s the kind of cooking that gets me through real life — and I have a feeling it’s about to get you through
yours too. Try the ghee version and tell me I’m wrong.
You might also like: 15-Minute Chicken Fried Rice That Beats Takeout