Budget Chicken Curry That Tastes Like Restaurant Curry
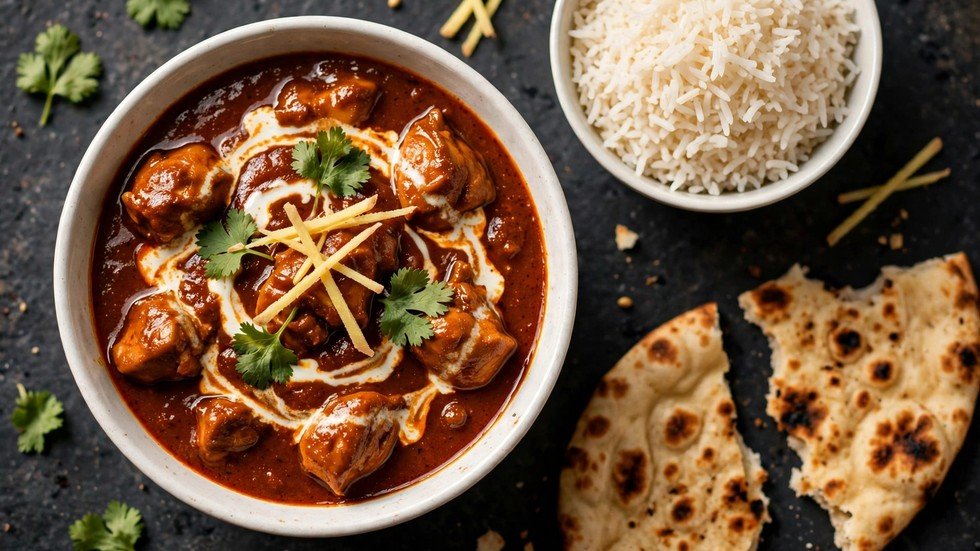
The last time I ordered chicken curry at a restaurant, the bill made me wince. One plate — a modest bowl of curry, two naans — cost more than my entire week’s grocery run for chicken. I sat there doing the math in my head while mopping up gravy, and I thought: there has to be a way to get this flavor at home without the restaurant markup. That’s how this budget chicken curry was born.
There is. And the secret isn’t expensive ingredients. Restaurant curry tastes the way it does because of technique, not money. Deeply browned onions. Spices bloomed in hot oil. A masala cooked until it surrenders its oil. And one humble dried herb that costs almost nothing but smells like a tandoor.
This budget chicken curry is the recipe I landed on after months of testing — and by testing, I mean eating a frankly unreasonable amount of curry. It uses cheap bone-in chicken pieces, pantry spices, and yogurt instead of cream. The gravy is thick, glossy, and layered. Nobody at my table has ever guessed it cost a third of the restaurant version.
Quick Stats
- Prep Time: 15 minutes
- Cook Time: 35 minutes
- Total Time: 50 minutes
- Servings: 4–5
- Difficulty: Easy
- Cost Per Serving: Roughly the price of a cup of chai
- Best Served With: Steamed basmati rice, naan, or chapati
Equipment Needed
Curry rewards heavy cookware. Thin pots scorch the masala before it ever gets a chance to develop.
- A heavy-bottomed pot, Dutch oven, or deep karahi with a lid — even heat is everything when you’re browning onions for fifteen minutes straight.
- A sharp knife and cutting board — you’ll slice two onions thin and chop tomatoes fine.
- A wooden spoon — for the long, patient stirring the onion stage demands.
- A small bowl — for whisking the yogurt smooth before it meets the hot pan. This tiny step prevents curdling disasters.
Ingredients & Substitutions
- 750g bone-in chicken pieces (leg quarters or mixed curry cut) — bone-in is the budget move and the flavor move. Bones release gelatin and richness into the gravy as they simmer, and curry-cut chicken costs noticeably less than boneless breast. Ask your butcher for “curry cut.”
- 2 large onions, thinly sliced — the backbone of the gravy. Slice them thin and even so they brown at the same rate.
- 2 medium tomatoes, finely chopped — fresh is best. In winter when tomatoes are pale and sad, a tablespoon of tomato paste plus one fresh tomato works.
- ½ cup plain yogurt, whisked smooth — the budget stand-in for cream. Full-fat yogurt gives the richest result; low-fat works if you temper it carefully.
- 1 tablespoon ginger-garlic paste
- 4 tablespoons oil — you need enough for proper onion browning. Don’t skimp here; most of it becomes the gravy.
- Whole spices: 1 bay leaf, 3 green cardamoms, 3 cloves, 1-inch cinnamon stick — this is the restaurant aroma. Whole spices cost little and last months.
- 1 teaspoon cumin seeds
- 1 tablespoon coriander powder
- 1 teaspoon cumin powder
- 1 teaspoon Kashmiri red chili powder — for color without brutal heat. Regular chili powder works; use half.
- ½ teaspoon turmeric
- 1½ teaspoons salt, plus more to taste
- 1 teaspoon garam masala — added at the end, never at the start.
- 1 teaspoon kasuri methi (dried fenugreek leaves) — the secret weapon. Crush it between your palms before adding. It smells like every good dhaba you’ve ever walked past.
- Fresh coriander and sliced green chilies, to finish
Step-by-Step Method
Step 1: Brown the onions — deeply, patiently, properly. Heat the oil in your heavy pot over medium heat. Add the sliced onions with a pinch of salt and cook, stirring every couple of minutes, for 12 to 15 minutes. You’re not softening them. You’re taking them to a deep golden brown, the color of jaggery. This is the single most important step in the recipe. Those browned onions break down into the gravy and give it a sweetness and depth that no shortcut can fake. If you rush this, the curry tastes thin. If you nail it, people ask for your secret.
Step 2: Bloom the whole spices and ginger-garlic paste. Push the onions aside, add the bay leaf, cardamoms, cloves, cinnamon, and cumin seeds. Let them sizzle for 30 seconds until fragrant — whole spices release their oils into the hot fat, which is how their flavor actually reaches the gravy. Add the ginger-garlic paste and cook for one minute, stirring. The raw smell should cook off completely.
Step 3: Add tomatoes and ground spices, then bhuno. Add the chopped tomatoes, coriander powder, cumin powder, chili powder, turmeric, and salt. Cook on medium-high, stirring often, for 6 to 8 minutes. The tomatoes should melt into the onions, and the whole masala should darken and start releasing oil around the edges. That oil separation is your signal: the masala is cooked, the spices have lost their rawness, and the gravy base is ready. Undercooked masala is the reason most home curries taste “homemade” in the bad way.
Step 4: Add the chicken and sear it in the masala. Add the chicken pieces and toss to coat every piece in masala. Cook for 5 to 6 minutes, turning occasionally, until the chicken firms up and picks up color at the edges. Searing the chicken in the masala — rather than boiling it in water later — builds a fond of browned flavor directly on the meat. This is another restaurant habit worth stealing.
Step 5: Add water and simmer low and slow. Pour in 2 cups of hot water — hot, not cold, so you don’t shock the masala and seize the texture. Bring to a boil, then drop the heat to low, cover, and simmer for 20 to 25 minutes. Bone-in chicken needs this time; the connective tissue slowly melts into gelatin, which gives the gravy its body and the meat its tenderness. Stir once halfway through. The curry is ready when the chicken is tender and the gravy coats a spoon.
Step 6: Whisk in the yogurt — off the heat. Take the pot off the flame. This matters: yogurt added to a furiously boiling curry splits into grainy flecks. Whisk your yogurt completely smooth in the bowl first, then stir it into the curry a spoonful at a time. Return the pot to low heat and simmer gently for 3 minutes. The gravy turns silky and takes on that restaurant richness — without a drop of cream.
Step 7: Finish with garam masala and kasuri methi. Sprinkle over the garam masala. Take the kasuri methi, crush it hard between your palms directly over the pot — crushing wakes up its aroma — and stir it in. Cover and rest for 5 minutes. Garnish with coriander and green chilies. Serve hot.
Pro Kitchen Tips
- Buy curry-cut chicken with bone. It’s cheaper per kilo than boneless, and the bones do real work — they enrich the gravy with gelatin during the simmer. Your gravy will have body that boneless breast can never give you.
- Brown onions in a wide pot, not a tall narrow one. Onions piled deep steam instead of browning. Surface area is the difference between 12 minutes of browning and 25 minutes of frustration.
- Kasuri methi is the cheat code. That unmistakable restaurant smell — slightly smoky, slightly sweet — is dried fenugreek. A teaspoon costs almost nothing and transforms the dish. Crush it fresh over the pot every time.
- Make a double batch of masala. Steps 1 through 3, doubled, frozen in portions. On a busy night, thaw the masala, add chicken, and you’re 25 minutes from dinner.
- Hot water, not cold. Adding cold water to a hot masala drops the temperature and makes the oil seize back into the gravy unevenly. Keep a kettle handy.
Troubleshooting Advice
- My gravy is thin and watery. You added too much water or didn’t bhuno long enough. Fix it now: simmer uncovered on medium heat until it thickens and the oil glistens. Next time, add water in smaller splashes — you can always add more.
- The yogurt split and looks grainy. The curry was too hot when the yogurt went in, or the yogurt wasn’t whisked smooth. Prevent it by taking the pot off the heat and whisking the yogurt completely lump-free first. If it’s already split, a quick blitz with an immersion blender usually rescues the texture.
- It tastes flat despite all the spices. Almost always under-salted or under-bhunoed. Add salt in quarter-teaspoon pinches and taste. Then ask: did the masala truly release its oil in Step 3? That caramelization is where depth lives.
- The chicken is tough. Bone-in pieces need the full simmer — don’t cut Step 5 short. If using boneless breast, it needs less time, not more; add it later in the simmer so it doesn’t overcook.
- Too oily on top. Restaurant curries do carry oil, but if yours is swimming, skim the excess with a spoon. Next time, measure the oil instead of pouring freely — 4 tablespoons is enough.
FAQs
Can I use boneless chicken instead of bone-in?
Yes. Use 600g boneless thigh pieces — they stay juicier than breast. Reduce the simmer in Step 5 to 12–15 minutes, since there’s no bone or connective tissue to break down. You’ll lose a little gravy body, so let it reduce a touch longer uncovered.
How long does this curry keep?
Four days in the fridge in an airtight container, and it genuinely tastes better on day two as the flavors settle. It freezes well for up to 2 months — thaw overnight in the fridge and reheat gently. Add the fresh coriander garnish after reheating.
How can I make it creamy without cream?
You’re already doing it — the whisked yogurt is the budget cream. For extra richness, blend a quarter of the gravy (before adding chicken back) until smooth and stir it in. Cashew paste is the restaurant method, but it costs more; yogurt plus a proper bhuno gets you 90% of the way there.
This curry proved something to me that I keep relearning: great flavor is a technique problem, not a money problem. Brown the onions properly, cook the masala until it shines, finish with kasuri methi — and nobody at your table will ever guess what it cost.
You might also like: 15-Minute Chicken Karahi for Busy Weeknights