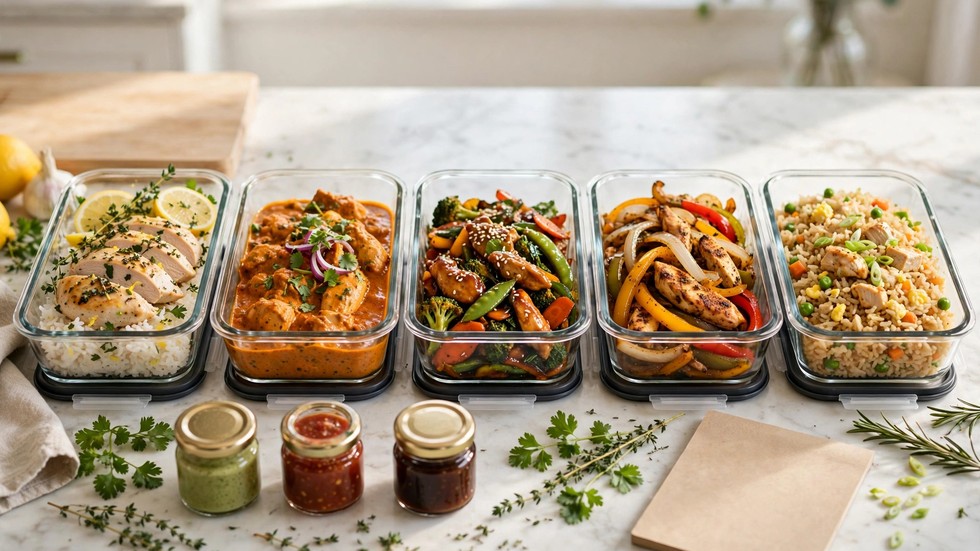
5-Day Chicken Meal Prep: One Session, Five Dinners
Two years ago I did the math on my takeout habit and immediately wished I hadn’t, which is what pushed me to build this 5 day chicken meal prep system. Weeknight exhaustion plus a food delivery app is a dangerous combination — by Thursday I was ordering the same biryani for the third time that week and paying for the privilege. I tried meal prep twice and quit twice, because every guide I found gave me five identical containers of dry chicken and broccoli, and by Wednesday I would rather have eaten the container.
The breakthrough came when I stopped thinking of meal prep as cooking one meal five times, and started thinking of it as running a tiny production line: one protein, three flavor profiles, five genuinely different dinners. This is that system. One 90-minute Sunday session, 1.5 kilos of chicken, and you walk into every weeknight with dinner already decided, already cooked, and — this is the part that matters — not boring. Monday’s lemon-herb chicken tastes nothing like Wednesday’s teriyaki stir-fry, even though they came out of the same oven on the same afternoon.
Quick Stats
- Active Session Time: 90 minutes
- Yields: 5 dinners for 2 (10 portions)
- Total Chicken: 1.5 kg
- Difficulty: Easy-Medium
- Storage: 4 days in the fridge; day-5 portions freeze well
Equipment Needed
- Two large sheet pans — the oven does half the work in this system, and two pans let you roast chicken and vegetables simultaneously instead of in shifts.
- A large skillet or frying pan — for the quick-sear items that don’t suit the oven. Cast iron or heavy stainless holds heat best for a proper sear.
- A rice cooker or a large pot with a lid — grains cook unattended while you handle everything else. A rice cooker is ideal because it switches itself to warm and waits for you.
- Five or more airtight containers, preferably glass — glass reheats evenly, doesn’t stain from turmeric, and lets you see what’s inside. Compartment containers are a bonus but not required.
- A chef’s knife and a big cutting board — you’ll process all the vegetables in one go before touching raw chicken, which keeps things safe and fast.
- Tongs, a spatula, and an instant-read thermometer — the thermometer is how you guarantee juicy chicken across three different cooking methods without guessing.
- Small jars or containers for sauces — sauces stored separately are the entire anti-boredom strategy. Don’t skip these.
- Masking tape and a marker — for labeling days. Future-you, staring into the fridge at 7 pm, will be grateful.
What You’ll Need
The chicken (1.5 kg total):
- 750g boneless chicken thighs — for the tikka bowls and fajita filling. Thighs stay juicy through roasting, chilling, and reheating, which makes them the workhorse of meal prep.
- 750g chicken breast — for the teriyaki stir-fry and fried rice, where thin strips and small dice cook fast and reheat well. Slice against the grain for tenderness.
The grains:
- 500g basmati or brown rice (dry) — the base for three of the five dinners. Basmati reheats fluffier; brown is chewier and more filling. Cook it all at once — the rice cooker earns its keep here.
The vegetables:
- 2 bell peppers, 1 large onion, 2 zucchini — for roasting alongside the chicken. Hardy vegetables that hold their texture after days in the fridge.
- 400g frozen broccoli florets — straight from the freezer into the stir-fry on Wednesday. Frozen veg is pre-blanched, so it reheats better than fresh for prep purposes.
- 2 carrots, a handful of baby spinach, 4–5 spring onions — for the fried rice and fresh finishing touches.
The flavor station (this is what makes five meals feel different):
- For tikka marinade: 150g plain yogurt, 1 tbsp ginger-garlic paste, 1 tsp each cumin, coriander powder, Kashmiri chili, garam masala, 1 tsp salt, juice of half a lemon.
- For teriyaki-style glaze: 80ml soy sauce, 2 tbsp honey, 1 tbsp grated ginger, 2 cloves garlic minced, 1 tsp cornstarch mixed with 1 tbsp water.
- For fajita seasoning: 2 tbsp oil, 1 tsp each cumin, smoked paprika, oregano, ½ tsp chili flakes, 1 tsp salt.
- For the lemon-herb dinner: olive oil, 1 lemon, dried oregano, 4 cloves garlic.
- Yogurt-herb sauce: 150g yogurt, chopped mint or coriander, pinch of salt, squeeze of lemon — stirred together in two minutes, and it transforms the tikka bowls.
Plus: 4–5 tortillas or wraps (stored separately, not in the containers), 2 eggs for the fried rice, cooking oil, salt, and black pepper.
The Five Dinners (Your Week at a Glance)
Before the session steps, here’s where everything is headed — knowing the destination makes the cooking make sense:
- Monday — Lemon-Herb Chicken with Rice & Roasted Veg. The simplest plate: roasted breast, fluffy rice, caramelized vegetables, lemon squeezed over at serving.
- Tuesday — Chicken Tikka Bowls. Yogurt-marinated thighs over rice with spinach and a generous drizzle of yogurt-herb sauce.
- Wednesday — Teriyaki Chicken Stir-Fry. Breast strips glazed sticky-sweet with broccoli and carrots over rice.
- Thursday — Chicken Fajita Wraps. Spiced thigh strips with peppers and onions, wrapped in warm tortillas (tortillas stored separately and warmed day-of).
- Friday — Chicken Fried Rice. Diced leftover-style chicken tossed with day-old-textured rice, egg, spring onions, and soy. The classic end-of-week clean-out that tastes intentional.
5 Day Chicken Meal Prep: Step-by-Step Session Plan
Step 1: Read the whole plan and set a 90-minute timer.
Meal prep fails when you improvise the order. The sequence below is engineered so nothing ever waits: rice cooks while you chop, chicken marinates while the oven heats, sauces get stirred while pans are occupied. Read it once, then start. Put on music. This is the only thinking required all week.
Step 2: Start the rice and preheat the oven to 220°C (425°F).
Rinse the rice, get it going in the rice cooker or pot — it needs zero attention from here. Crank the oven with both sheet pans inside; hot pans going in means vegetables start roasting on contact instead of steaming. Line the pans with parchment now, while they’re cool enough to handle.
Step 3: Chop every vegetable before touching the chicken.
Dice the peppers, onion, and zucchini into roast-friendly chunks. Slice carrots thin for the stir-fry. Chop spring onions. This is food-safety logic as much as speed: once raw chicken is on the board, everything else needs a washed board, and washing mid-session breaks your rhythm. Vegetables first, always.
Step 4: Divide the chicken into three marinade bowls.
Thighs go in two bowls: one gets the tikka marinade (yogurt, spices, lemon), the other the fajita seasoning (oil, cumin, paprika, oregano). Breast strips go in the third with half the teriyaki ingredients (soy, honey, ginger, garlic — save the cornstarch slurry for Wednesday’s reheat). Massage everything well. Fifteen minutes of marinating while the oven heats is plenty for thin pieces — this isn’t an overnight situation.
Step 5: Load the sheet pans and roast.
Tikka thighs on one pan with half the roast vegetables; lemon-herb breast (tossed with olive oil, garlic, oregano, salt) on the other pan with the remaining vegetables. Into the 220°C oven for 20–22 minutes. The high heat gives you browned edges and caramelized vegetables — the flavor that makes Monday and Tuesday taste like real cooking, not reheated food.
Step 6: Sear the remaining chicken in the skillet while the oven works.
Two batches, hot pan, don’t crowd: fajita thigh strips first (3–4 minutes per side), then teriyaki breast strips. You’re looking for golden-brown sear marks, not full cooking — everything finishes in the oven’s residual plan or during reheating, and slightly undercooking now prevents dryness later. Check the thickest pieces hit 74°C (165°F); pull them the moment they do.
Step 7: Stir the sauces while everything cooks.
Yogurt-herb sauce: yogurt, herbs, salt, lemon — done. Teriyaki glaze: simmer soy, honey, ginger, garlic for 2 minutes, whisk in the cornstarch slurry until glossy, cool. These take five minutes total and they’re the reason five chicken dinners don’t taste like one chicken dinner repeated.
Step 8: Portion with the sauce-separation rule.
Grains on one side, protein next to them, vegetables alongside — and sauces in their own small jars, never poured over. Sauce sitting on rice for four days makes everything soggy and sad; sauce added fresh at serving makes it taste cooked that evening. Fill containers for Monday through Thursday; Friday’s fried-rice components go in one container together (they’re getting tossed in a hot pan anyway).
Step 9: Cool, label, and store properly.
Leave containers open for 20–30 minutes until the steam stops — sealing hot food traps condensation, which is both a sogginess problem and a food-safety problem. Then lid, label with the day and contents (“TUE — tikka bowl, sauce in jar”), and refrigerate. Anything meant for Friday can go straight to the freezer if your fridge runs warm; thaw Thursday night.
Pro Kitchen Tips
- The 74°C rule is your insurance policy. An instant-read thermometer across three cooking methods guarantees every piece is safe and none is overcooked. Overcooked on Sunday means chalky on Wednesday — there’s no recovering it.
- Cool rice fast and refrigerate promptly. Spread cooked rice on a tray for 10 minutes before portioning. Rice is the one food-safety item people underestimate; cool it within an hour and get it into the fridge.
- Freeze Friday’s portion from the start. Four days is the comfortable fridge limit for cooked chicken. Portioning Friday’s dinner into the freezer on Sunday removes all doubt — thaw it Thursday night in the fridge.
- Double the sauces, always. The yogurt-herb and teriyaki glaze disappear faster than you expect, and they’re also excellent on eggs, salads, and weekend sandwiches. Leftover sauce is never wasted.
- Keep tortillas and fresh garnishes out of the containers. Tortillas go stale and gummy in the fridge next to moist food; store them sealed at room temperature and warm them in a dry pan on Thursday. A fresh squeeze of lemon or handful of coriander added day-of makes a three-day-old bowl taste alive.
- Reheat like you mean it. Microwave covered with a splash of water at 70% power, or better: a hot skillet for the stir-fry and fried rice. High-power microwaving is how meal prep chicken turns rubbery.
Troubleshooting Advice
- The reheated chicken is dry. It was overcooked on Sunday or blasted in the microwave. Fix today’s portion: reheat covered with a tablespoon of water or stock, which steams moisture back in. Fix next week’s: pull chicken at exactly 74°C and reheat gently at reduced power.
- The rice is hard or crunchy after reheating. It dried out in the fridge — normal, and fixable. Sprinkle a tablespoon of water over the rice before reheating and keep it covered; the steam rehydrates the grains. Storing rice in truly airtight containers (not loosely covered bowls) prevents most of this.
- Vegetables went soggy by Wednesday. They were stored touching sauced or very moist items, or sealed while still steaming. Next session: cool everything fully before lidding, and keep roasted vegetables in their own section away from sauces.
- I’m bored by Thursday. The variety system failed somewhere — usually the sauces got skipped or everything got mixed together. Commit to the sauce jars and the day-of fresh touches (lemon, herbs, warmed tortilla). Five different flavor profiles only work if you actually deploy them.
- I ran out of time and the session took two hours. First sessions always run long — you’re learning the choreography. The second time, with the order memorized, it genuinely fits in 90 minutes. The biggest time-saver: chopping all vegetables before the chicken, so there’s no mid-session board washing.
- Something smells off on day 4. Trust your nose and throw it out — no meal is worth the risk. This is why Friday’s portion goes in the freezer. When in doubt, the freezer is always the right call.
FAQs
How long does chicken meal prep last in the fridge?
Four days is the safe, comfortable limit for cooked chicken stored properly in airtight containers in a cold fridge (below 4°C/40°F). That’s why this plan runs Monday to Thursday from the fridge, with Friday’s portion frozen on prep day and thawed Thursday night. Never push cooked chicken to day five from the fridge.
Can I use only chicken breast, or only thighs?
You can, with adjustments. All-thigh is the juicier, more forgiving option — thighs reheat beautifully and the whole plan works as written. All-breast works too, but pull every piece at exactly 74°C (165°F) with no carryover guesswork, and be extra gentle when reheating. I use the split because each cut suits different dinners best.
What are the best containers for meal prep?
Glass containers with locking airtight lids — they reheat evenly in the microwave, don’t absorb turmeric stains or odors the way plastic does, and you can see what’s inside without opening them. Compartment-style glass containers are ideal for keeping components separate. Whatever you use, make sure the seal is genuinely airtight; a loose lid dries food out within two days.
You might also like: 15-Minute Chicken Fried Rice That Beats Takeout
Ninety minutes on a Sunday for five decided dinners is the best trade I’ve made in my kitchen, and this 5 day chicken meal prep is why it works. The real win isn’t even the money saved — though that’s substantial — it’s the 7 pm version of me, tired and decision-fatigued, opening the fridge to find the choice already made and dinner ten minutes away. Start this Sunday. By next Sunday, you’ll wonder why you ever did it any other way.