Air Fryer Chicken Wings: Crispy Without Deep Frying
I used to believe crispy wings required a deep fryer, a gallon of oil, and a kitchen that smelled like a chip shop for two days. Then a friend served me air fryer chicken wings crispy straight from the basket at a match night, and I stood in her kitchen eating them off the tray, genuinely confused. The skin shattered when I bit down. There was barely any oil involved. I made her show me the basket, the settings, everything — twice.
What I’ve learned since, through probably thirty batches, is that crispiness isn’t about the amount of oil. It’s about dryness and rendered fat. Chicken skin is already full of fat; your job is to get the surface as dry as possible and then let hot circulating air do what deep oil does — render that fat out and crisp what’s left. The air fryer is almost unfairly good at this, because the fan constantly strips away the humid air clinging to the skin.
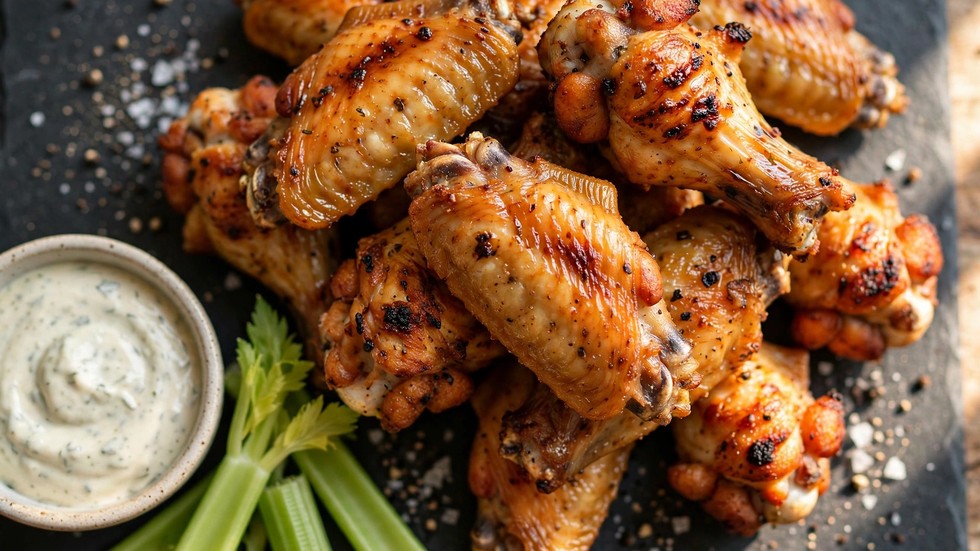
These wings come out deeply golden, audibly crunchy, and juicy inside. No batter, no deep fryer, no greasy stovetop. Just a clever coating, the right temperature, and a little patience.
Quick Stats
- Prep Time: 10 minutes (+ 1 hour uncovered rest in the fridge, optional but recommended)
- Cook Time: 25 minutes
- Total Time: 35 minutes (plus optional resting time)
- Servings: 4 (about 1kg / 2 lbs wings)
- Difficulty: Easy
- Best Served With: Ranch or blue cheese dip, celery sticks, and cold drinks
Equipment Needed
The air fryer does the heavy lifting, but a couple of small tools make the difference between good wings and great ones.
- An air fryer with a basket or tray — any size works; you’ll just cook in batches if it’s small. A model with a removable crisper plate gives the best airflow underneath the wings.
- Tongs — for flipping the wings halfway. Fingers near a 200°C basket are a bad idea, and tongs keep the coating intact better than shaking alone.
- Paper towels, plenty of them — moisture is the enemy of crispiness, and you’ll be patting these wings very dry. Don’t skimp.
- A large mixing bowl — big enough to toss the wings in the coating without them piling up and getting uneven coverage.
- A wire rack and tray — optional, for the uncovered fridge rest. Air circulating around the wings dries the skin beautifully.
Ingredients & Substitutions
- 1kg (about 2 lbs) chicken wings, split into flats and drumettes — buy them already split if you can; separating whole wings at the joint is fiddly. Look for wings that aren’t injected with excess water — cheaper “enhanced” wings weep moisture in the air fryer and never crisp properly.
- 1 tablespoon baking powder (NOT baking soda) — this is the whole trick. Baking powder raises the skin’s pH, which breaks down proteins and encourages browning, and its tiny bubbles create a rougher surface that crisps into a crackling crust. Baking soda tastes metallic and soapy — do not substitute. Use aluminum-free baking powder if you’re sensitive to that faint metallic note.
- 1½ teaspoons kosher salt — seasons the meat and draws moisture from the skin. If using fine table salt, reduce to 1 teaspoon.
- 1 teaspoon garlic powder — garlic flavor without the burn risk of fresh garlic, which would scorch at these temperatures.
- 1 teaspoon smoked paprika — for color and a gentle smokiness. Sweet paprika works; hot paprika adds a kick.
- ½ teaspoon black pepper, coarsely ground — the coarse grind survives the heat and gives little pops of flavor.
- 1 tablespoon neutral oil or oil spray — just enough to help the coating adhere and promote even browning. The wings render plenty of their own fat; this is a helper, not the main event.
- Sauce of choice, for tossing (optional) — classic buffalo, honey-sriracha, or garlic butter (recipes below in the tips section).
Air Fryer Chicken Wings Crispy: Step-by-Step Method
Step 1: Pat the wings completely dry.
Open the wings onto a tray lined with paper towels and pat every single one dry — top, bottom, sides. Then pat them again with fresh towels. This step feels excessive the first time you do it. It isn’t. Surface moisture turns to steam in the air fryer, and steam is the opposite of crisp. Every drop you remove now is crunch you gain later. The wings should feel tacky, not wet, when you’re done.
Step 2: Toss with baking powder, salt, and spices.
In your large bowl, mix the baking powder, salt, garlic powder, smoked paprika, and black pepper. Add the wings and toss thoroughly until each one is evenly coated in a thin, dusty layer. Then drizzle over the oil (or give them a light spray) and toss once more. The coating should look like a fine powdery film, not a paste — if it’s clumpy, you’ve used too much oil.
Step 3: Rest uncovered in the fridge (the secret step).
Arrange the coated wings on a wire rack over a tray and refrigerate uncovered for at least 1 hour, or up to 8 hours. Cold, circulating fridge air dehydrates the skin further, and the salt has time to penetrate the meat. This is the step that separates good wings from the ones people talk about. Short on time? Even 30 minutes helps. Skipping it entirely still gives you decent wings — but you’ll taste the difference once you’ve tried it the proper way.
Step 4: Preheat the air fryer.
Set your air fryer to 200°C (400°F) and let it preheat for 3 to 5 minutes. Starting the wings in a fully hot basket means the skin starts rendering immediately instead of slowly warming up and steaming in its own moisture. It’s the same logic as a screaming-hot pan for searing.
Step 5: Arrange in a single layer with space.
Place the wings in the basket in a single layer, skin-side up where possible, leaving a little gap between each one. Hot air needs to circulate around every surface — wings crammed together steam each other and the touching spots stay pale and soft. If your air fryer is small, cook in two batches. A crowded basket is the number one reason for disappointing wings.
Step 6: Air fry, flipping halfway.
Cook for 12 minutes, then open the basket and flip each wing with tongs. You’ll already see the skin tightening and turning golden. Cook for another 10 to 13 minutes, until deeply golden-brown and crisp all over. The skin should look blistered and crackled, almost like pork crackling. If your wings are very large, they may need the full time; smaller ones crisp faster. When in doubt, go by color and sound — tap one with the tongs and it should sound hollow and crisp.
Step 7: Rest briefly, then sauce (or don’t).
Let the wings rest for 3 to 5 minutes on a wire rack or plate. The skin actually crisps further as it cools slightly — straight from the basket it’s at its softest. If saucing, toss the wings in warm sauce in a large bowl right before serving. Warm sauce clings better than cold, and tossing at the last second keeps the crust crunchy underneath. Serve immediately with dip and celery.
Pro Kitchen Tips
- Baking powder, never baking soda. Worth repeating because it’s the most common mistake. Baking soda is far more alkaline and leaves a distinct soapy, metallic taste. Baking powder gives you all the crisping chemistry with none of the off-flavor.
- The uncovered fridge rest is free crispiness. It takes zero effort — just planning. I coat the wings in the morning and they’re ready for an evening cook. Meal-prep friendly by accident.
- Don’t sauce too early. Sauce is wet, and wet undoes crisp. Toss the wings in sauce at the very last moment, right before they hit the table. Better yet, serve the sauce on the side for dipping and let everyone choose.
- Two-ingredient sauces that never fail. Buffalo: ½ cup hot sauce melted with 4 tablespoons butter. Honey-sriracha: ⅓ cup honey warmed with 3 tablespoons sriracha and a squeeze of lime. Garlic butter: 4 tablespoons melted butter with 3 minced garlic cloves warmed until fragrant and a handful of parsley.
- Double batches for a crowd. Cook in batches and hold the finished wings on a wire rack in a 120°C (250°F) oven. They stay crisp for up to 45 minutes this way — the dry oven heat keeps working in your favor.
Troubleshooting Advice
- The skin is leathery, not crispy. The wings went in wet, or the basket was overcrowded. Be ruthless with the paper towels next time and cook in batches. You can rescue a soft batch: give them 5 more minutes at 200°C in a single layer — it won’t be perfect, but it helps.
- White smoke is coming from the air fryer. Rendered chicken fat is dripping onto the heating element. It’s alarming but usually harmless — pause, carefully pour out the accumulated fat from the drawer, and continue. For very fatty wings, empty the drawer at the halfway flip as a preventive habit.
- The coating tastes chalky or powdery. Too much baking powder, or it wasn’t tossed evenly. One tablespoon per kilo is the ratio — measure it, don’t eyeball. And make sure the oil toss at the end distributes everything into a thin film.
- Uneven browning — pale spots where wings touched. Classic overcrowding. Those pale patches are where hot air couldn’t reach. Next time, leave real gaps between wings. For this batch, flip and give the pale sides a few extra minutes.
- They’re crispy but bland inside. The salt didn’t have time to penetrate. The uncovered fridge rest solves this — even 1 hour makes a difference. In a rush, you can lightly salt the wings 15 minutes before coating to give the seasoning a head start.
FAQs
Can I cook frozen wings in the air fryer?
You can, but manage your expectations. Thawed wings crisp far better because you can pat them dry and the baking powder coating adheres properly. If cooking from frozen, add 8 to 10 minutes, skip the baking powder (it won’t stick to icy skin), and season after cooking. For the shattering-crisp result in this recipe, thaw first.
What’s the difference between baking powder and baking soda here?
Both are alkaline, but baking soda is roughly four times stronger and leaves a metallic, soapy taste on the skin. Baking powder is a balanced mix that raises the skin’s pH just enough to accelerate browning and crisping without any off-flavor. They are not interchangeable in this recipe.
Can I meal prep these wings?
Yes, with one rule: store them unsauced. Cooked wings keep 3 to 4 days in the fridge. Reheat in the air fryer at 190°C (375°F) for 4 to 5 minutes — they come back remarkably crisp, almost like fresh. Sauce them only after reheating, right before serving. They also freeze well for up to 2 months; reheat from frozen at 190°C for 8 to 10 minutes.
You might also like: 15-Minute Chicken Karahi for Busy Weeknights
Once you nail the dry-skin-plus-baking-powder formula, you’ll stop ordering wings entirely — air fryer chicken wings crispy from your own kitchen beat takeaway every time. No deep fryer to clean, no oil to dispose of, no lingering smell — just a basket of crackling, golden wings and the quiet satisfaction of having cracked the code.